The 20 Best At Home Prenatal Exercises For Expecting Moms
Are you wanting to exercise during pregnancy but unsure how to navigate your growing belly?
You may be surprised to know that many of your favorite exercises prior to pregnancy are safe during pregnancy.
During pregnancy, it is best to modify or adjust your workouts, not eliminate exercise all together.
However, you may feel a little nervous about how exercise affects you and your baby during pregnancy, what exercises are safe during pregnancy and how to modify your workouts as your body changes.
Rest assured, in a normal and healthy pregnancy, prenatal exercise has numerous benefits for both you AND your baby!
Did you know that medical experts not only agree but encourage women with healthy pregnancies to engage in 30 minutes of moderate intensity exercise on most, if not all, days of the week? (ACOG)
Regular exercise during pregnancy can help your body prepare for labor, reduce risk of a C-section, prevent excess weight gain and can even make your baby smarter!
I get asked almost daily for the best prenatal exercises you can do at home.
So I figured I would round up some of my favorite exercises that you can easily add to your prenatal workout routine.
In this post, I share 20 of my top favorite safe pregnancy exercises at home that will leave you feeling refreshed, energized, strong and confident during your pregnancy!
Related: 25 Benefits Of Prenatal Exercise That Will Make You Want To Move
Disclaimer: The material on this blog and social media associated with this blog are provided for educational purposes only. While I have a Bachelors of Science Degree in Kinesiology-Exercise Science and am a Certified Prenatal/Postnatal Exercises Specialist, this content should not be used for medical advice, diagnosis or treatment, or in place of therapy or medical care. You are responsible if you choose to try any of the workouts or advice given on this blog.
“I’m Pregnant, Should I Keep Working Out?”
Yes, yes, YES!
Many misconceptions about exercising during pregnancy can make it feel very confusing!
However, in both my professional and personal opinions, this confusion leads to most pregnant mamas I work with to be overly cautious, even to the point of not exercising during pregnancy at all.
I have had three babies in four years and exercising during pregnancy feels like one of the best things I could have done for both myself and my babies.
Physical activity of 150 or more minutes per week has been associated with improved pregnancy outcomes, compared to women who participated in less than 60 minutes per week. (Tinloy, 2014)
With that said, despite holding a bachelors of Science degree in Kinesiology and a Certified Prenatal/Postnatal exercise specialist, prenatal fitness, I am not a doctor.
For this reason, I strongly recommend consulting with your healthcare provider to discuss the most appropriate avenue of exercise for your pregnancy.
Every person and pregnancy are very different and your workout routines should be approved by you doctor.
“Why Does Exercise During Pregnancy Feel So Scary?”
Even in a non-pregnant person, exercise is something that feels a little uncomfortable at times, right?
Your muscles burn, you breath heavy and you may even be sore the next day.
So naturally, we think these discomforts are causing harm to our baby.
Well, I have good news for you!
The burning in your muscles has no direct effect on your baby and all that extra blood your heart is pumping during your workouts is actually providing MORE oxygen and nutrients to the placenta!
This means your baby is also benefiting from your workout session as well, pretty cool right?
Not only does exercise help your baby receive more oxygen and nutrients, staying active will also help you reduce stress, reduce discomforts, boost mood and may even help you push your baby out faster!
“How Do I Know How Hard I Can Exercise?
Unsure what fitness level you are?
Here is a quick overview of how to determine your exercise level and intensity during pregnancy.
| Level | |
|---|---|
| Beginner | You started training less than two months ago. You have been consistent but only once or twice a week at low intensity. You may also have limited movement skill and strength training. |
| Intermediate | You have been training/exercising consistently for 2-6 months and about 3 times a week at a moderate intensity. You have some basic movement skills. |
| Advanced | You have been strength training/exercising consistently for a year or more and you train 3-4 times a week. You also have experienced high training stress and volume, understand your body’s recovery needs, has a high level of movement skills. |
Prenatal Exercise Intensity Guidelines
Because heart rate responses to prenatal exercise vary from person to person, current guidelines from the American College of Obstetricians and Gynecologists suggest the most accurate way to determine exercise intensity during pregnancy is by the ratings of perceived exertion scale.
Your specific exercise intensity is determined by several factors such as how long you have been exercising prior to pregnancy, the specific workout and exercises you are doing and your work/rest ratio.
| Activity Level | Perceived Exertion |
|---|---|
| Level 1 Little or no activity | Anything other than sleeping such as watching tv, reading or riding in a car. |
| Level 2-3 Light Activity | Easy to carry a conversation and intensity could be sustained for hours. |
| Level 4-6 Moderate Activity | Breathing becomes heavier, and it becomes more difficult to hold a conversation but the intensity feels like it could be sustained for hours. |
| Level 7-8 Vigorous Activity | Intensity is on the verge of becoming uncomfortable and are unable to sustain the activity for long periods of time. You can only speak a few sentences or words at a time. |
| Level 9 Very Hard Activity | Intensity is very difficult to sustain. It feels like you can barely breathe and you can hardly speak a word. |
| Level 10 Maximal Activity | Almost impossible to sustain. You can hardly breathe and you cannot speak at all. |
10 Prenatal Lower Body Exercises
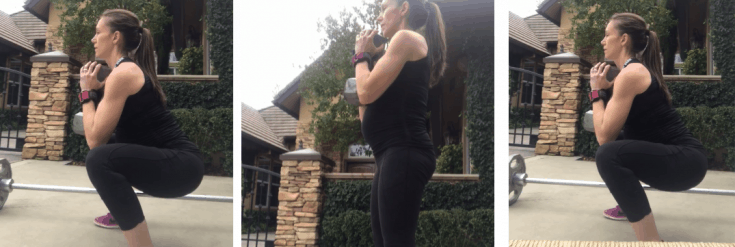
Prenatal Sumo Squats
1. Place your feet slightly wider than hip width apart with your toes very slightly pointed out. Note: Depending on the stage of pregnancy, you may need to have your legs wider to accommodate your belly as you descend.
2. With your elbows at your sides, clasp your hands together at your chest. Here you can hold a dumbbell or no weight.
3. To begin the squat, engage your core and slowly press your knees out as if you are spreading the floor with your feet and begin to sit back into your hips. Note: You can place a chair behind you to help you gauge your movement.
4. Once you reach the bottom, exhale and stand.
5. If using a dumbbell, hold the dumbbell in front of your chest.
6. Repeat this movement until reps are completed.
What to avoid
- Allowing your knees to cave in toward each other.
Not moving slow and controlled and dropping too fast.
Tucking your tailbone or hyperextending you low back. Focus on keeping a neutral spine.
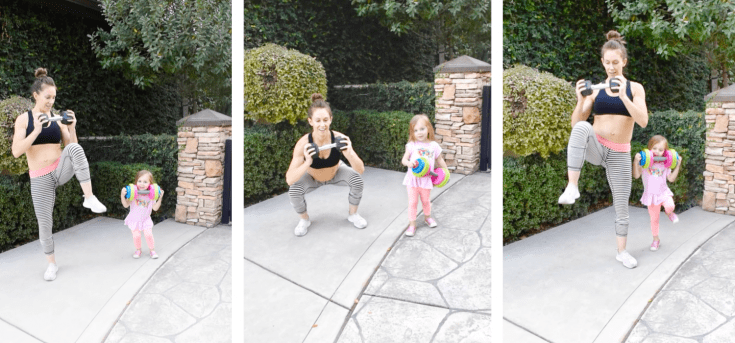
Squat Side Crunch
1. Begin with by performing a squat while holding a dumbbell at chest height.
2. As you stand, lift your right knee while brining your right elbow and knee together to perform a side crunch.
3. Return to your squat position and repeat on the left side.
4. Continue alternating to complete reps
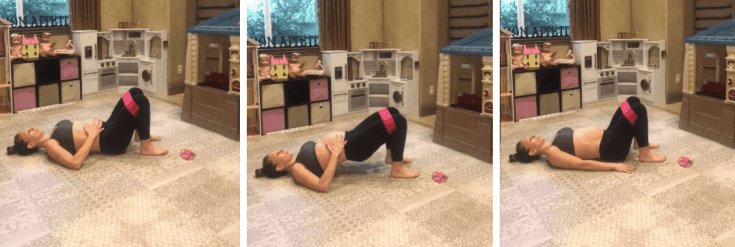
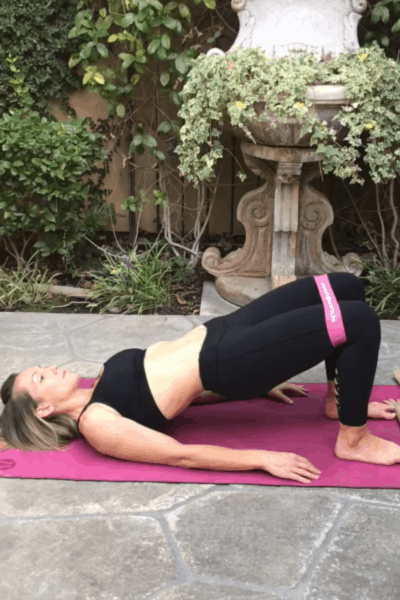
Banded Glute Bridge
1. Start on you back with your hands on the floor by your side, your knees up and feet comfortably placed on the floor. Place the loop band around your knees.
2. Exhale and engage you core and pelvic floor. Slightly press your knees against the loop band as you press through your heels to contract your glutes.
3. Lift you hips off the ground until your reach a straight line from your shoulders to your knees.
4. With your core and glutes firmly engaged, hold this postion at the top and begin opening and closing your knees against the loop band.
5. At the end of the reps, slowly reverse the motion as you inhale on the way down.
6. You can also do this as a simple glute bridge by omitting the pulses at the top of the exercise.
What to avoid
Overarching your lower back by lifting your hips too high
Lifting or flairing your rib cage.
Allowing your knees to collapse in toward eachother
Not keeping your shoulders relaxed and straining your neck.
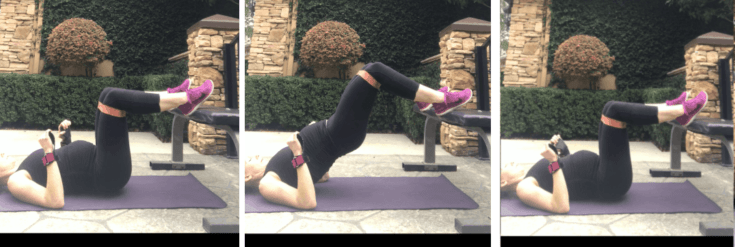
Feet Elevated Glute Bridge
1. Begin on your back with heels on top of a chair or any sturdy surface. Your feet should be about hip width apart. I like to place a loop band around my knees for extra glute engagement.
2. Exhale and engage your core by lifting up your pelvic floor.
3. Press down through your heels as you squeeze your glutes to lift your hips off the floor toward the ceiling.
4. Hold this position for a few seconds without over-arching your low back.
5. Inhale as you lower back to the floor.
6. Repeat until reps are completed.
What to avoid
- Allowing one side of your pelvis to drop. Core and glute engagement will help keep your pelvis straight.
- Arching your lower back. Keep your core engaged.
- Straining your neck muscles. Keep your shoulders relaxed.
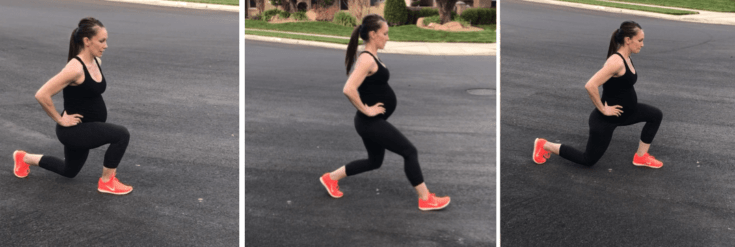
Walking Lunges
1. Begin with your feet about shoulder width apart.
2. Keeping your core engaged and pelvis squared, step one foot forward while keeping it in line with your hip bone.
3. Step far enough so that both knees create a 90 degree angle as you lower into a lunge.
4. Push through your front heel as you stand and bring your back leg to meet your front leg.
5. Step the opposite leg forward and repeat.
6. Continue alternating legs in a forward motion for reps.
7. You can also do this exercise while holding a pair of dumbbells at your side.
What to avoid
Setting your feet too far apart or too narrow. Later in pregnancy, this exercise may bother your pubic bone. If so, I suggest trying reverse lunges or skip all together.
Shifting your hips. Keeping your core engaged will help prevent your hips from dropping as your step forward.
Arching your back.
Allowing your knee to move too far past your toes. A litte movement past your toes is okay but excessive movement can cause knee pain.
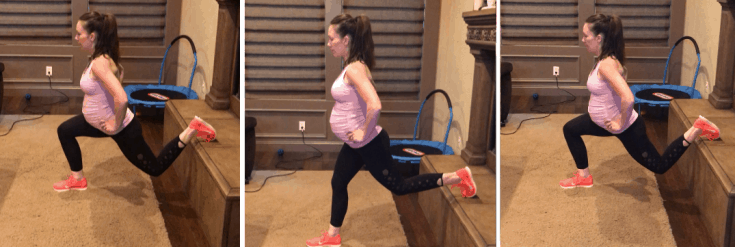
Bulgarian Split Squat
1. Begin by standing about 1.5-2 feet in front of a bench with your back to the bench.
2. Carefully place one foot behind you onto the bench. Your toes can be either curled under or the top of you foot flat on the bench.
3. Place your hands on your hips or hold a pair of dumbbells at your side.
4. Inhale as you bend your front knee and lower into a single leg squat, keeping your weight centered over the foot on the floor.
5. As you exhale, focus on pushing through your heel and contracting your glutes to return to standing.
6. Repeat until reps are completed then switch legs.
- What to avoid
Rounding your shoulders forward.
- Not keeping your core engaged and hyperextending your lower back.
- Allowing your front knee to collapse inward or outward.
- Pushing through the toes to stand instead of the heal
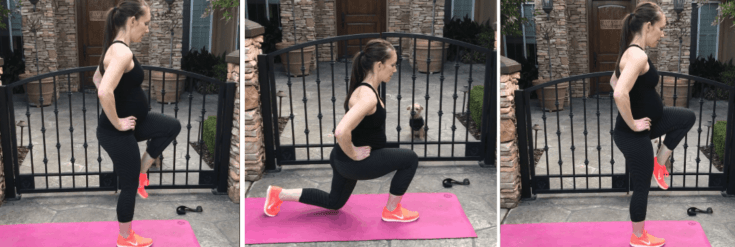
Reverse Lunge
1. Start with your feet hip width apart and in line with your hip bones.
2. Engage your core and while keeping your pelvis squared, step one foot backward keeping your foot inline with your hip.
3. Step far enough back so that both knees create a 90 degree angle as you drop down into a lunge.
4. Press through your front foot to bring your back leg to the starting position.
5. Repeat until all reps are completed on one side then switch sides.
6. You can also do this exercise with dumbbells.
What to avoid
- Stepping too far back or not far enough.
- Allowing your hips to shift when you step back.
- Arching your lower back.
- Moving your front knee too far forward.
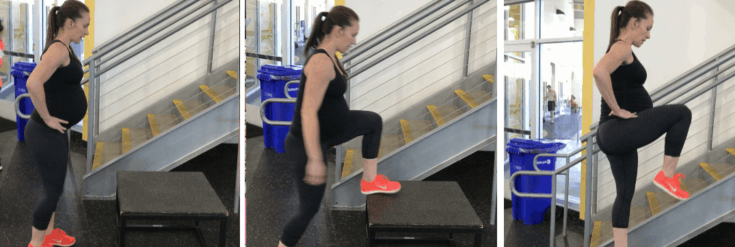
Step Ups
1. Start by standing in front of a box, bench or chair. You can also hold dumbbells at your sides.
2. Step onto the flat surface with your entire foot and push through your foot to engage your glutes and quads to lift your body into standing position.
3. Focus on keeping your knee stable as you stand.
4. Keep the same foot on the surface and lower your free leg back to the starting position.
5. Complete all reps before moving to the next leg.
What to avoid
Dropping your hip on the way down. Focus on keeping the glutes engaged to prevent this from happening
Using your bottom foot to propel yourself up
Flairing your rib cage
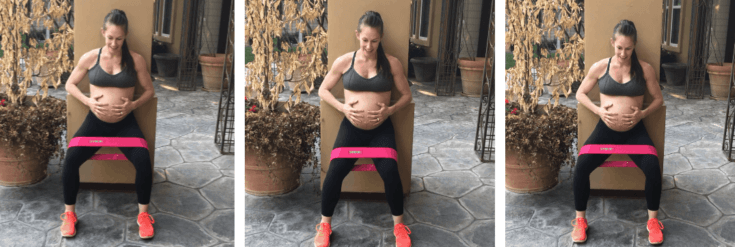
Wall Squat Booty Burner
1. Start by placing a loop band around your knees and lean your back against a wall. Place you feet about 2 feet from the wall.
2. Engage your core and slowly slide down the wall as if you are going to sit in an imaginary chair. Do not decend lower than your hips. Your thighs should be about parallel to the ground.
3. Hold a slight pelvic tilt as you press your lower back into the wall.
4. Once you are in proper position, begin slowly opening and closing your legs.
5. Continue in the wall squat position until reps or interval is complete.
What to avoid
- Sinking too low in the wall squat. Make sure your hips do not drop below your knees.
- Arching your lower back. Maintain a pelvic tilt and keep your lower back pressed against the wall
- Holding your breath
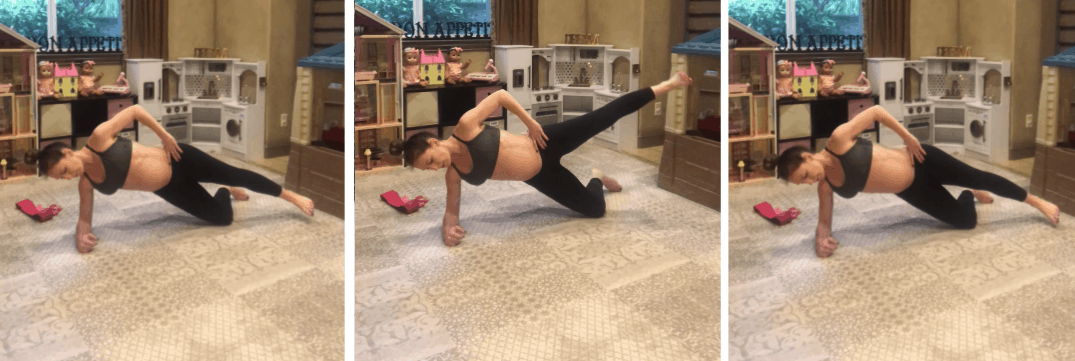
Outer Thigh Burner
1. Begin by lying on your side.
2. Position yourself in a side plank position, resting your forearm. Make sure you elbow is under your shoulder and your neck is relaxed.
3. Engage your core and lift your hips up off the ground. Squeeze your glute to provide stability.
4. Straighten the top leg and slow lift your leg toward the ceiling, hold for a second, then lower without out touching the floor or dropping your hips.
5. Repeat to complete reps or interval, then switch sides.
- What to avoid
- Arching your low back in the side plank position.
- Allowing too much movement in your midsection as you lift your leg. Keeping your glutes and core engaged will help minimize movement.
- Scrunching your shoulders.
10 Upper Body and Full Body Prenatal Exercises
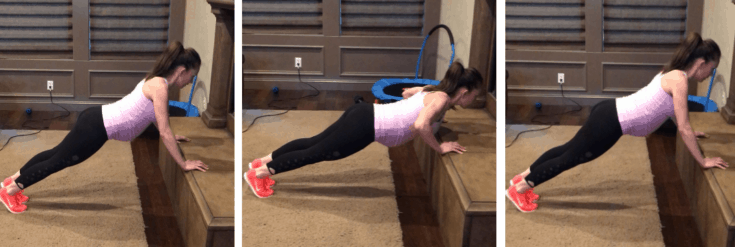
Incline Push-Up
1. Begin with your hands directly under your shoulders on a bench or sturdy chair in a plank position. Try to align the edge of the bench with your nipple line.
2. Make sure your core is firmly engaged to avoid any bulging or pressure in your abdominal wall or pelvic floor.
3. Keeping your shoulders down away from your ears, inhale and slowly lower toward the bench keeping your elbows slightly tucked into your sides.
4. Once your chest reaches the bench, exhale and press through your hands to return to the starting position.
5. Focus on keeping your core and pelvic floor engaged and move your body as an entire unit, not just your arms.
6. Repeat this movement until reps are completed
- What to avoid
Saggine or allowing your belly to droop toward the floor causing an arch in your lower back.
Allowing your elbows to flare to far out.
Moving your hips and upper body seperatly.
Dropping your head forward.
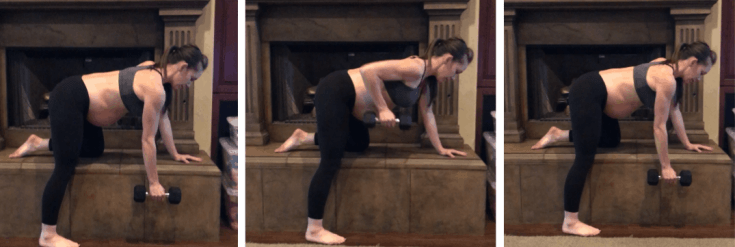
Single Arm Dumbbell Row
1. Place one arm and one leg on a bench and carefully pick up a dumbbell with you opposite hand. Support yourself with one hand on the bench and one knee on the bench OR both feet flat on the floor.
2. Your back should be parallel to the floor and core firmly engaged. Imagine liftining your belly so that it doesn't hit the bench.
3. To initiate the movement, draw your shoulder blade back and down as you contract your upper back (behind the shoulder blade) to lift the weight into a row position.
4. Lift the weight up and slightly back toward your hips until your elbow is inline with your shoulder.
5. Hold this position for a moment, the slowly reverse the motion.
6. Repeat until all reps or interval is completed on one side, then switch sides.
What To Avoid
- Arching your rounding your back. Keep a neutral spine.
- Shrugging your shoulders up toward your ears.
- Twisting your torso as you lift the weight.
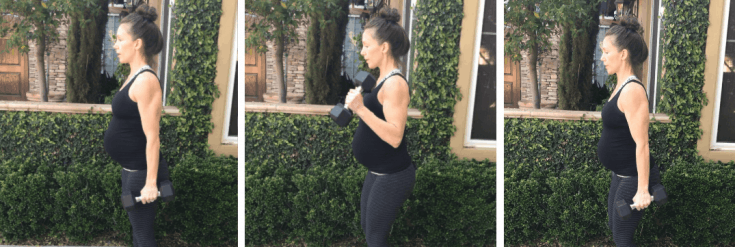
Hammer Bicep Curl
1. Begin by standing with feet about hip width apart and a dumbbell in each hand with palms facing in toward your hips.
2. Keeping your core engaged to prevent arching in your back and elbows close to your sides, slowly bring the dumbbells up toward your shoulders. You can alternate one at a time or both together.
3. Slowly lower the weights back to the starting position.
- 4. Repeat until you have competed all reps.
What to avoid
Using momentum and swing the weights.
Flaring your elbows and not keeping them at your sides.
Rounding your upper back or arching (hyperextending) your lower back.
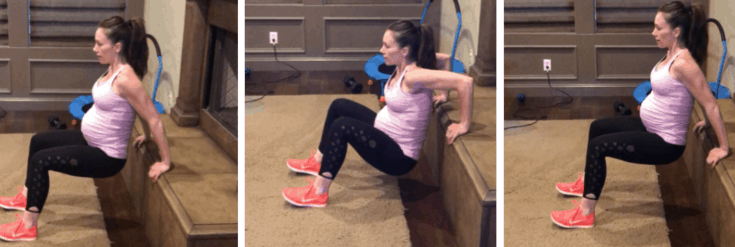
Tricep Dips
1. Begin by sitting on a stable chair or bench with your hands about shoulder width apart on the surface.
2. Slowly slide your butt off the front of the chair or bench while slightly extending your legs out in front of you.
3. Engage your core and straighten your arms while maintaining a slight bend in your elbows to keep tension in the triceps and pressure off your joints.
4. Keeping your elbows close to your body, slowly bend and lower your body toward the floor until your elbows are about 90 degrees.
5. Make sure you keep your back close to the chair or bench.
6. Once you are at the bottom, press through your palms on the bench to straighten you elbows, returning to the starting position.
7. Continue to complete reps or interval.
What to avoid
- Scrunching your shoulders up toward your ears.
Allowing your back to move too far out from the bench. - Letting your elbows flair out away from your body.
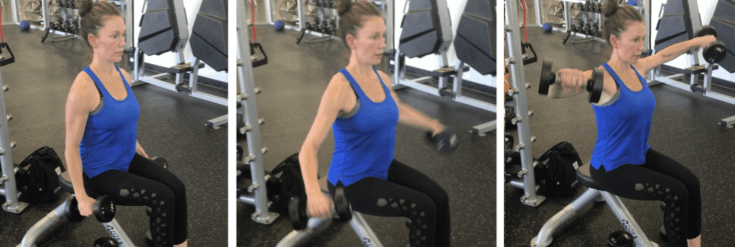
Seated Lateral Raises
1. This exercise can be done seated or standing. Find a position that is most comfortable for you in your stage of pregnancy. (pictured above, 4 weeks postpartum)
2. Holding a pair of dumbbells with your palms facing in toward your thighs, slowly lift your arms out to your sides while maintaining a slight bend in the elbow.
3. Do not lift above your head. Arms should be inline with your shoulders.
4. Hold for a moment at the top then slowly lower back to the starting position.
5. Continue to complete reps or interval.
What to avoid
- Arching your back. Keep your core engaged.
- Scrunching your shoulders.
- Swinging the weights and using momentum.
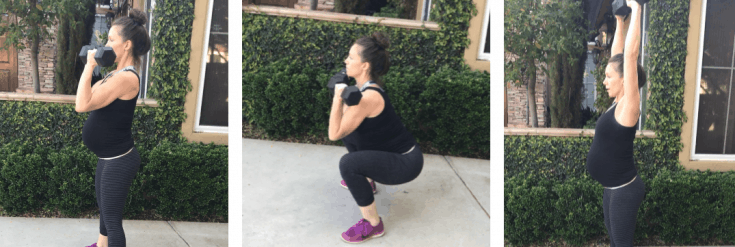
Squat Thrust
1. Begin standing with your feet about shoulder width apart of slightly wider to help you squat comfortably.
2. Holding a dumbbell in each hand, slowly curl them up so they are at your shoulders.
3. Inhale and engage your core as you squat down as if to sit in a chair while resting the dumbbells on your shoulders as you squat.
4. At the bottom of the squat, exhale and drive through your heals, to come up from the squat and press the dumbbells overhead as you stand.
5. Make sure your biceps are in line with your ears during the entire movement and DO NOT allow your back to arch as you press the weight above your head.
6. Slowly lower the weights back to your shoulders.
7. Repeat until all reps or interval is complete.
What to avoid
- Allowing your knees to collapse in toward each other.
- Pushing through your toes to squat instead of driving through the heal and entire foot.
- Not maintaining core control as your press the weight above your head causing your ribcage to lift and arching in your back.
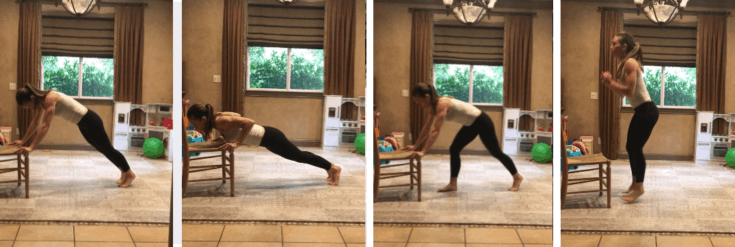
Burpees (modified)
A personal note on burpees.
I believe that traditional burpees are a great, full body exercise during pregnancy as long as they feel good for YOU and YOUR body.
Because this exercise does require proper core engagement, I recommend modifying them as your belly grows and it becomes more challenging to keep your core engaged.
The best way to modify a burpee during pregnancy is to place your hands on an elevated surface such as a chair or a bench.
Modified Version:
1. Start in a standing position with feet shoulder width apart.
2. Bend your knees to squat and place your hands on a chair or stable surface in front of you.
3. Step or jump both feet back behind you into an elevated plank position. Focus on keeping your core engaged to avoid arching your back and allowing your hips to sag.
4. Drop to do a push-up bringing your chest toward the bench. You can omit the pushup if this does not feel good for your body.
5. Return to the plank position and jump or step your feet forward toward your hands and then jump straight up into the air. You can omit jumping and just lift your hands into the air.
What to avoid
- Arching your back in the plank position
- Coning in your core
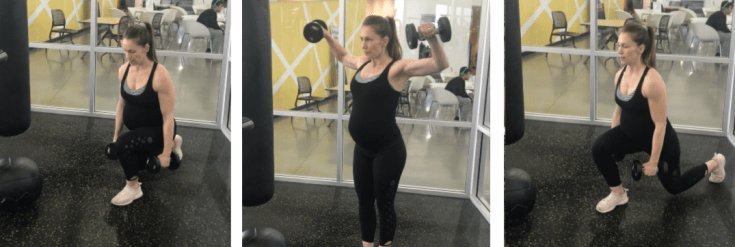
Reverse Lunge Lateral Raise
This exercise combines the seated or standing lateral raise listed above with a reverse lunge.
1. Begin by holding a dumbbell in each hand with your palms facing inward.
2. Step back into a reverse lunge position.
3. As you step back forward to the starting position, lift the weights out to your sides.
4. Slowly lower the weights back to your sides and repeat on the opposite leg.
5. Continue alternting back and forth to complete reps or interval.
- What to avoid
- Stepping too far back or not far enough in the reverse lunge.
- Arching your lower back.
- Scrunching your shoulders and you lift the dumbbells for the lateral raise.
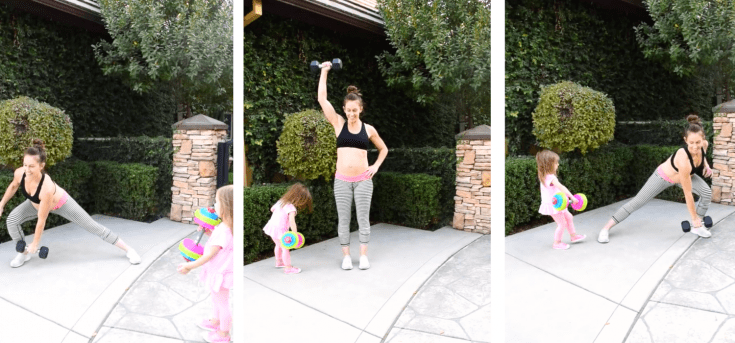
Lateral Lunge Shoulder Press
Begin by standing with your feet together with a dumbbell in your right hand.
2. Take a large step laterally with your left leg, keeping your foot parallel to the right foot as you place it on the ground.
4. Keep the left hip pushing back while reaching the dumbbell toward the left foot.
5. To stand, push the left foot into the ground while pulling the body back to center.
5. Step your feet back together and press the dumbbell above your head to perform a shoulder press.
6. Continue to complete reps or interval.
What to avoid
Stepping too far out during the lateral lunge.
Scrunching your shoulders or arching your lower back during the shoulder press.
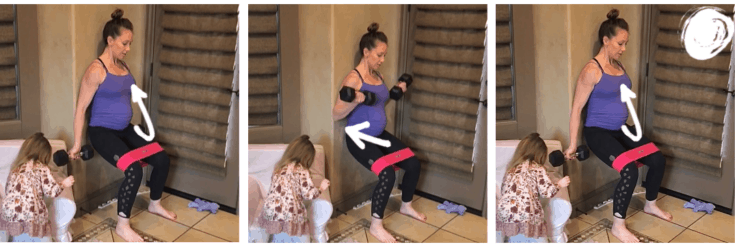
Wall Squat Bicep Curl
1. Place a loop band around knees and begin in a wall squat position with thighs as close to parallel to the ground as possible.
2. Focus on lifting up your pelvic floor with your core. Imagine “hugging” your baby to engage your core. Make sure your back is pressed firmly to the wall, shoulders are relaxed and staying strong through your legs.
3. If using a loop band, press firmly against the loop band to engage your glutes.
4. Keeping the back of your arms (triceps) against the wall, lift the weight into a bicep curl.
5. Slowly lower and repeat for instructed number of reps.
- What to avoid
- Sinking too low and allowing your hips to drop below your knees.
- Arching your lower back. Keep core engaged and low back firmly pressed against the wall.
- Scrunching your shoulders.
- Not keeping the back of your arms against the wall.
Related: 6 Prenatal Core Exercises Fit Moms Swear By
3 Sample Prenatal Home Workouts
Perform 12-15 reps of each exercise in a circuit, resting 15-30 seconds in between exercises depending on fitness level.
Complete 3-4 circuits total.
Workout #1
- Sumo squats
- Incline pushups
- Regular or modified burpees
- Reverse lunge lateral raise
- Outer thigh burner
Workout #2
- Banded glute bridge
- Walking lunges
- Hammer bicep curl
- Bent over rows
- Bulgarian split squat
- Wall squat booty burner
Workout #3
- Step ups
- tricep dips
- Squat side crunch
- Lateral lunge shoulder press
- Wall squat bicep curl
Final Thoughts On Prenatal Exercise
I can confidently and enthusiastically say that staying active during all three of pregnancies was the best thing I could have done for myself and my babies.
However, staying active is not easy.
Give these workouts a try and if you have any questions, I am only one email away.
As always, please make sure to consult with your health care provider before starting or continuing any exercise routine during pregnancy.

Brooke is a certified Prenatal and Postnatal Exercise Specialist with a Bachelors of Science degree in Kinesiology-Exercise Science. She is also a mom of 3 girls with more than 15 years of experience in health and fitness. Brooke’s goal at Struggles of a Fit Mom is to help motivate, educate and inspire other busy mamas who struggle with finding time, energy and motivation to take care of themselves in the chaos of motherhood.


