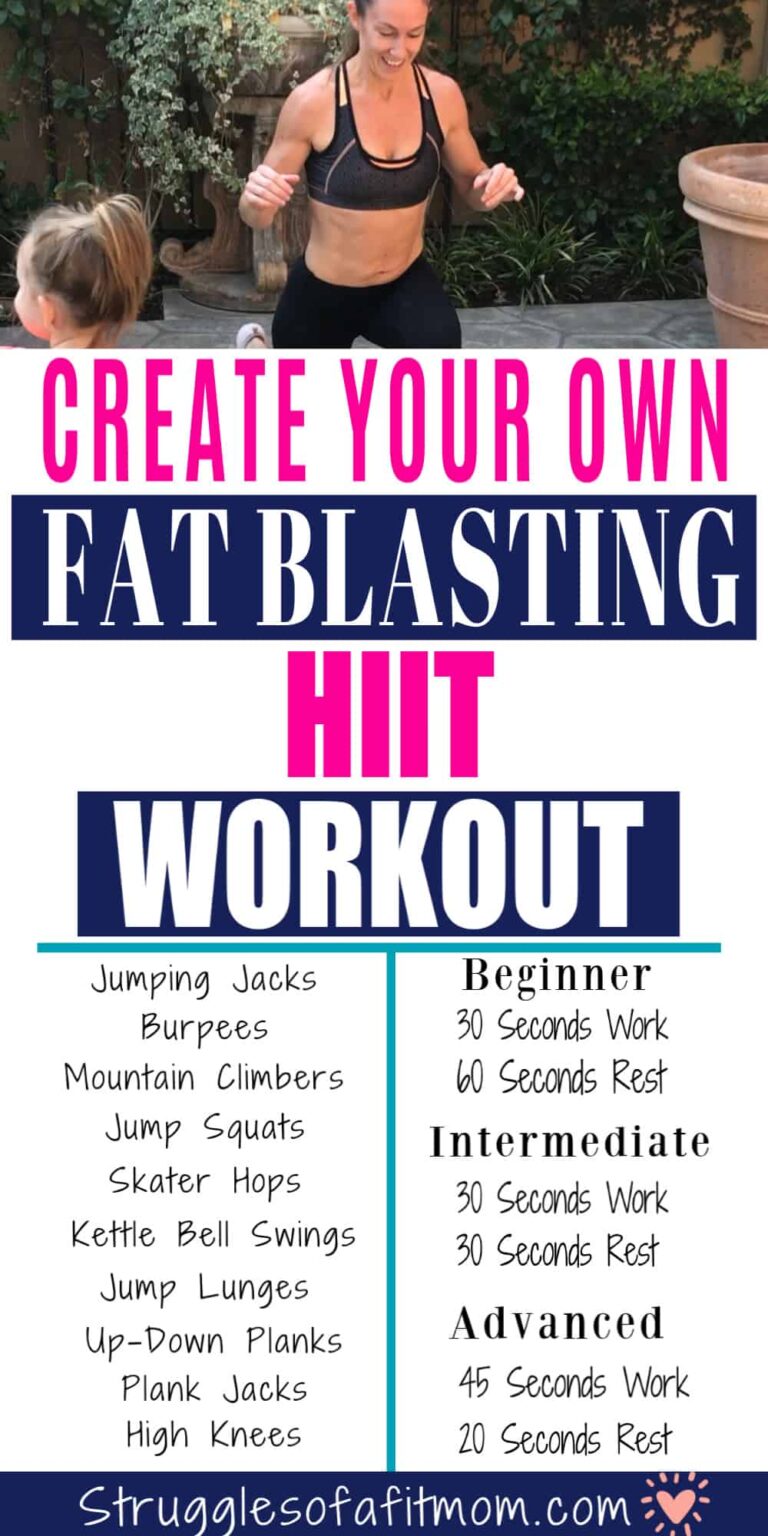
The Secret to Relieving Back Pain from Breastfeeding: [15 Best Exercises & Tips]
(This post probably contains affiliate links. I receive a small commission at no cost to you through links shared on this website to help keep the information I provide free to you)
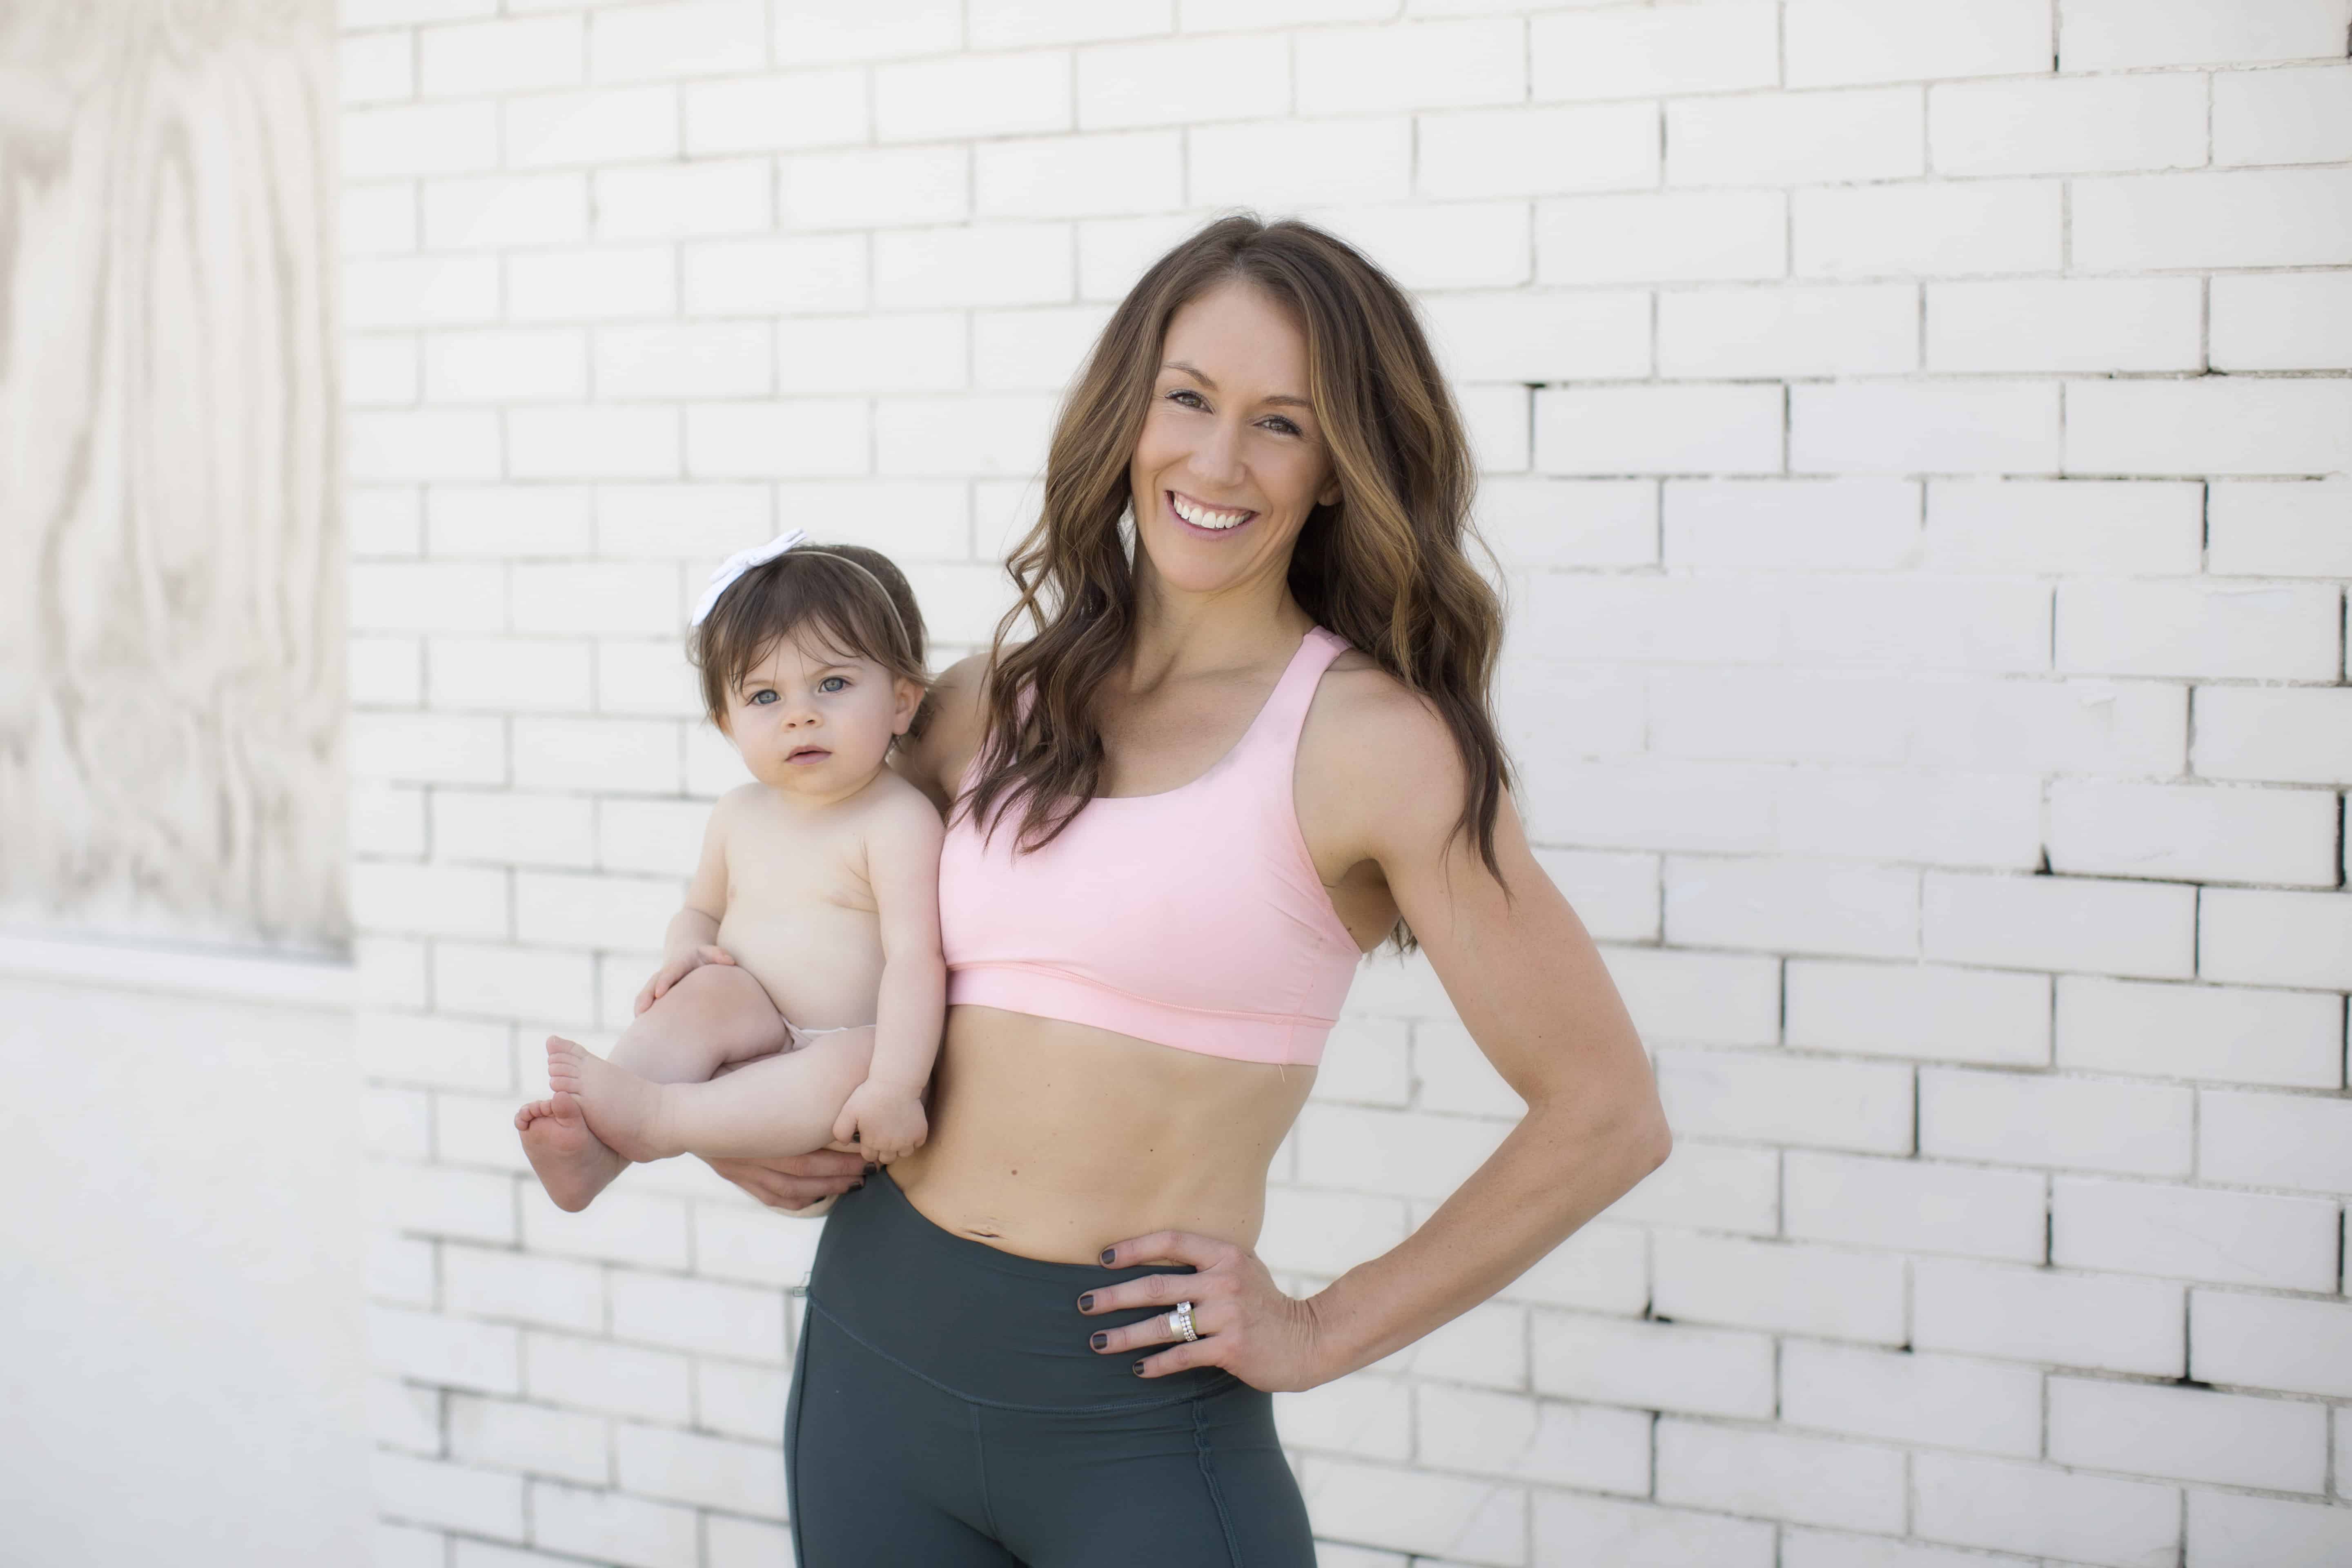
I’ve spent more than 24 months breastfeeding four babies and the back pain from breastfeeding is something I know all too well.
It is not uncommon for a new moms to experience back pain from breastfeeding and back-related issues are one of the most common reasons moms stop breastfeeding.
However, this doesn’t have to be your reality!
Today I am going to share some tips, gentle exercises, stretching exercises and corrective measures that can offer pain relief so you can enjoy this special time with your little one!
So let’s get started!

(Disclaimer: Although I am a certified prenatal/postnatal exercise specialist and personal trainer, I am not YOUR trainer. The content on this blog is for informational purposes only and should not be a substitute of the information and advice you receive from a healthcare professional.
What Causes Back Pain While Breastfeeding?
Breastfeeding is very physically demanding and average feeding sessions can last anywhere from 10-40 minutes.
The most common contributing factors include:
- Poor breastfeeding posture: Being in a slouched position can contribute to poor posture overtime.
- Incorrect feeing positions: There are many different feeding positions and finding the proper position will help take the strain of your back, neck and chest muscles.
- Weak back and core muscles: This causes poor posture which can lead to pain and discomfort.
- Weak Glute muscles: When these muscles are weak, they can’t support your spine and pelvis properly.
- Excess weight: Most moms carry extra weight after pregnancy. This combined with weak back muscles can cause a lot of discomfort.
- Increased Breast Size: Larger, milk-filled breasts can cause strain on your upper back.
- Baby wearing: Wearing your baby in carrier or baby wrap can add stress and stain to your body.
- Sleep deprivation: Lack of sleep can cause stress and tension in both your neck and back.
How To Prevent Back Pain While Breastfeeding
Fortunately, there are a few things you can do to help relieve back and neck pain and make breastfeeding more comfortable:
Practice Good Breastfeeding Posture
Sitting in a hunched over position multiple times a day while nursing will wreck havoc on your back and also cause neck pain.
If you are breastfeeding in an upright position, be sure to bring the baby to your breast instead of hunching over to bring your breast to the baby.
You should also try to sit in a comfortable but firm chair as often as possible to help provide support.
Use Props
Using supportive pillows or props helps to bring your baby closer to your breast so you don’t have to lean forward.

Change Positions
Breastfeeding position plays a big role in relieving back pain.
Avoid sitting in the same position for an extended period of time and change positions every once in a while to give your back a break.
Strengthen Back Muscles
Strengthening your back, neck, and shoulders will help reduce and/or prevent back pain.
Muscles that are overly stretched from a hunched over posture may feel like they need to be stretched when the actual problem is that the muscles are weak.
Rest When The Baby Sleeps
When all else fails, take a break!
Breastfeeding can be tiring, especially in the early weeks.
Adequate rest can relieve stress and muscle tension to help combat an achy back.
What is The Best Breastfeeding Position For Back Pain?
Breastfeeding shouldn’t make your neck or back feel sore and finding the right feeding position for you and your baby can take time.
The best breastfeeding position is the one that is most comfortable for you and your little one.
However, some positions may be better than others if you are struggling with back and neck pain.
Try alternating between these four most common breastfeeding positions:
1). The Cradle Position:
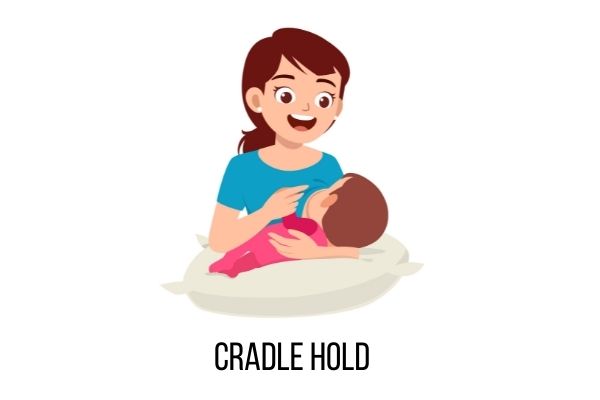
This is the most common position but it is not always ideal because it can be difficult to support your baby.
Propping your baby on a pillow and placing a pillow behind your back will help avoid straining your back.
How To Do It:
- Hold your baby on their side with their head in the crease of your elbow and body aligned with your forearm.
- Align your nipple with your baby’s mouth by using a prop so you are sitting in a neutral position and not slouching.
2. Cross-cradle hold:
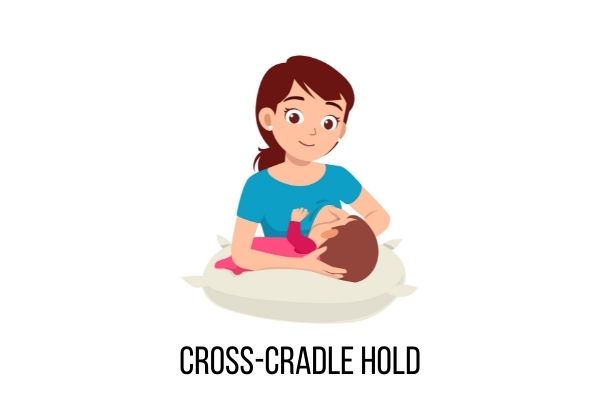
This position is similar to the cradle hold however instead of the baby resting on your forearm for support, your hand will be supporting their head and neck.
My lactation consultant recommended this position because you have more control over their head to ensure a good latch.
How To Do It:
- Sit up straight in a chair with a pillow behind your back for support if needed.
- Tuck your baby’s bottom toward the crease of the opposite elbow of the breast they are nursing from with their back resting against your forearm for support.
- Baby’s head should be resting in the palm of your hand for support and position your baby so that you are tummy-to-tummy.
3. The Football Hold:
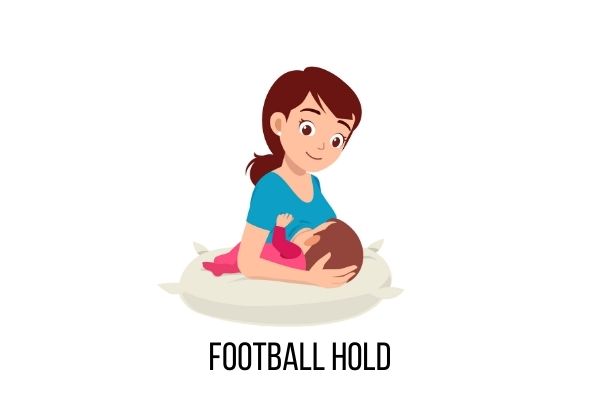
This position is a great option for moms who have had a c-section or are experiencing an achy back.
It allows you to support your baby’s head and neck with your hand while they feed from the side of your breast they are facing.
It also helps prevent back strain because you do not have to bend forward to bring your baby to your breast.
How To Do It:
- Hold your baby with your right arm and extend their legs and feet at your side and behind you.
- Your forearm should be supporting baby’s spine and their head should be resting in the palm of your hand.
- Pull your little one to your breast and allow them to latch.
- To protect your back, place a pillow under your arm for support and remember to bring your baby to your breast instead of slouching over.
4. Side-Lying Position:
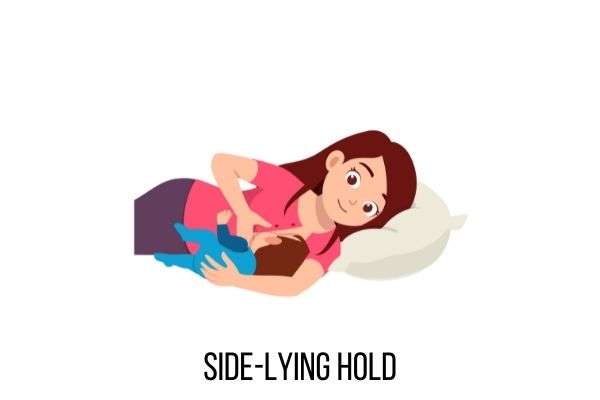
This position should be used with caution because it is unsafe to lay with your baby in bed, especially when they are very new.
However, this position is great because it doesn’t require you to be sitting upright during your nursing session.
How To Do It:
- Lie on your side in bed with a pillow behind your back and another one propped under your head.
- Your baby should be lying on their side facing you with their head supported by your hand.
- Bring your breast to their mouth to help them latch instead of leaning over them.
- You can also use a pillow to prop your baby up to meet your breast if needed.
Remember, never fall asleep in this position!
Exercises That Can Help Relieve Back Pain From Breastfeeding
Performing these simple exercises a couple times a week is the best way to keep your back strong and prevent pain:
1) Wall Angel
Why I love this exercise: It helps improve posture by lengthening the muscles in your front body that are often shortened from sitting in a hunched over breastfeeding position.
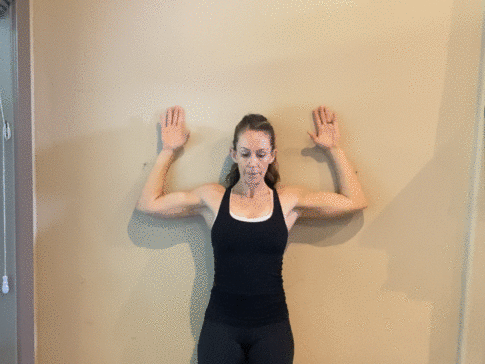
- Stand with your feet about four inches from a wall with your back against the wall. Flatten your low back into the wall by tucking your pelvis toward your ribcage with a slight posterior pelvic tilt.
- Draw your shoulders down away from your ears and slightly tuck your chin. (see above)
- Bring your arms to about 90 degrees with the back of your hands and forearms against the wall.
- Keeping your shoulders drawn down and away from your ears, squeeze your mid-back and slowly straighten your arms above your head as far as you can without letting your shoulders rise.
- Make sure your back, head, forearms and hands maintain contact with the wall the entire time.
- Once you reach the top, lower them back down to slightly below 90 degrees.
- Keep the repetitions slow and controlled.
2) Superman
Why I love this exercise: This exercise helps to counteract sitting in a slouched position.
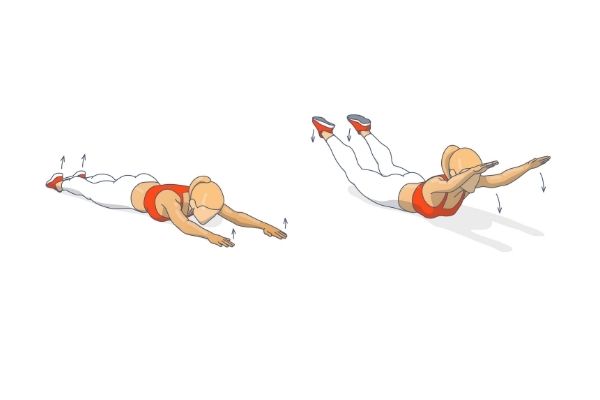
- Lie on the floor facedown with your legs straight and arms reaching above your head.
- Keeping your head straight with your spine, contract you lower back, the muscles between your shoulder blades and glute muscles simultaneously to slowly lift your arms and legs about 6 inches off the floor.
- Engage your core by trying to lift your belly button off the floor.
- Hold for 2–3 seconds without holding your breath.
- If this feels too challenging, start by lifting one arm and the opposite leg the alternating back and forth with the other side.
- Slowly lower and repeat.
3) Pelvic Tilt
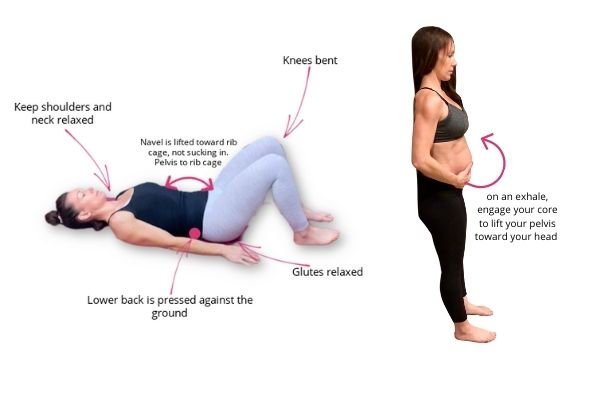
- Begin lying on your back with your knees bent. You will likely notice the natural curve in your back prevents your lower back from touching the ground.
- Inhale and on an exhale, engage your core and pelvic floor to rock your hip bones up toward your head and press your lower back against the ground.
- Imagine lifting your belly button up toward your head but not sucking in.
- Hold for a few breaths, then release.
4) Scapular Retractions
Why I love this exercise: Strengthens the muscles between your shoulder blades to reduce slouching and improve posture.
- Begin by lying on your stomach with your arms at your side and the palms of your hands facing toward your body. Place a rolled up towel underneath your forehead for support.
- Gently squeeze your shoulder blades together and slightly down.
- As you do this, you should feel the front of your shoulders lift off the ground but should not be coming up toward your ears.
- Hold for a few seconds then relax and repeat.
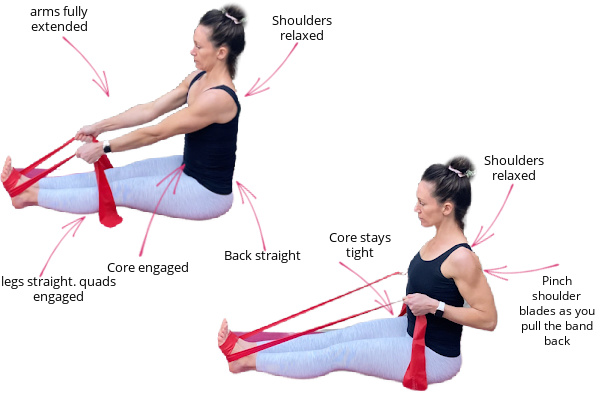
5) Chest Opener With Band
- Hold a resistance band out in front of your chest with your arms straight and shoulder-width apart.
- Draw your shoulder blades together and down as you pull your arms apart by imaging someone has their fingers on your spine between your shoulder blades and you are trying to pinch their fingers.
- Focus on preventing your ears from creeping up by your ears.
- Hold for 3-5 seconds and slowly return to the starting position.
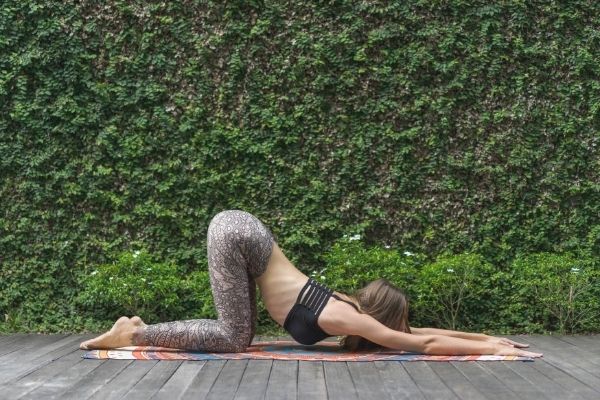
6) Cat/Cow Pose
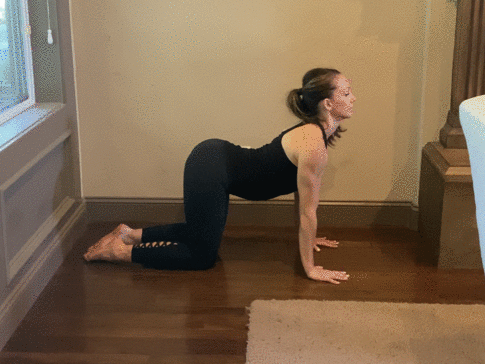
Why I love this exercise: This is a great exercises that helps improve mobility in your back.
- Begin on your hands and knees with your hands shoulder distance apart. Your writs should be directly under your shoulders and knees under your hips.
- Keep your back and neck straight my looking down and slightly forward.
- Inhale and slowly lower your belly toward the ground while taking your gaze up toward the ceiling.
- Tilt your pelvis back so that your tailbone sticks up.
- On the exhale, move your spine in the opposite direction by slowly drawing your belly button in toward your spine without sucking in and pushing through your hands to press your back up toward the ceiling.
- Bring your head inwards and slightly down to look at your navel.
- Repeat the cat/cow poses in a fluid motion
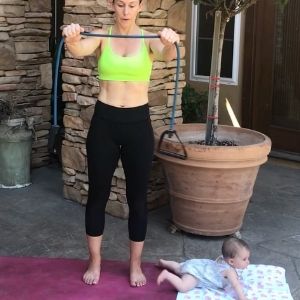
7) Resistance Band Rows
- Tie a medium strength resistance band to something sturdy such as a door handle or pole.
- Begin the movement by focusing on drawing your shoulder blades together and down to pull resistance band back, leading with your elbows.
- Once you have reached full contraction, hold for 3-5 seconds then very slowly return to the starting position, keeping both scapula drawn down and back.
Progression: Once this feels too easy, you can increase the strength of the resistance band or add pulses as you hold the flexed position.
Variations: You can change the height of the band which will slightly target different areas of your postural muscles.
8) Reverse Plank
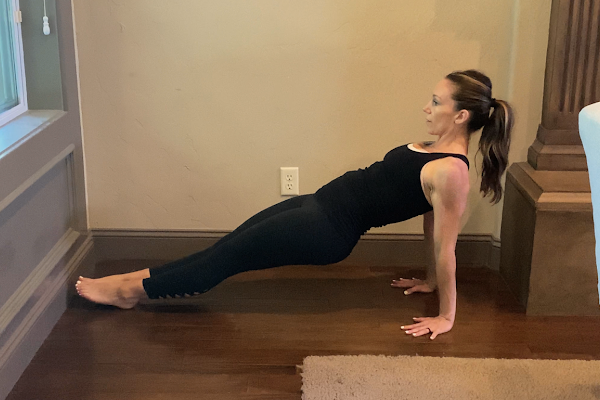
Why I love this exercise: It is a pregnancy and postpartum safe exercise that improves core strength and posture.
- Begin by sitting on the floor with your palms on the ground directly under your shoulders and fingers facing your feet.
- Slowly extend your legs in front of you and engage your core. To lift your hips and torso toward the ceiling, press your palms into the floor and squeeze your glutes.
- Keep your shoulder blades squeezing together and drawing down your back. Do not allow them to creep up toward your ears.
- Keep your core engaged by lifting your pelvic floor (not sucking in).
- Gaze up toward the ceiling or slightly in front of you.
- Hold the position for 30 seconds or as long as you can before your hips begin to sink.
9) Glute Bridge
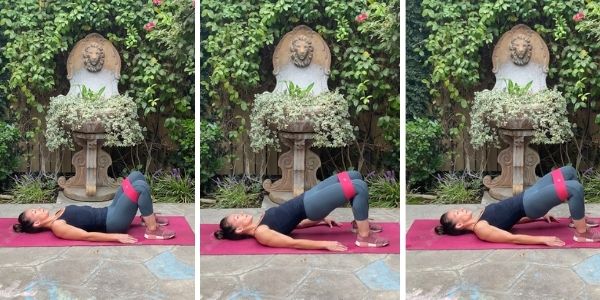
Why I love this exercise: Although this is technically not a back exercise, it can help prevent and relieve lower back pain by strengthening the glutes.
- Start on your back with your feet flat on the ground, knees shoulder width apart and place a loop band around your knees.
- Engage your core and press your heels through the floor while squeezing the glutes to lift your hips toward the ceiling. Your knees should be slightly pressing out against the loop band to activate the glutes.
- Hold at the top for 10 seconds, then slowly lower and repeat.
- Make sure to keep your core engaged through the entire movement to prevent hyperextending your hips or low back pain.
10) Shoulder External Rotation
Why I love this exercise: Strengthens the shoulders and scapula to prevent rounded shoulders and neck pain.
- Start by holding a resistance band in each hand with your arms at your side.
- Bend your elbows so that your forearms are parallel to the ground.
- Pull you shoulder blades back and down.
- Keeping your ribcage down, exhale and pull the band apart with while keeping your shoulders down and arms pressed against your body. You should feel this in your shoulders and your should blades.
- Hold for a brief second then release the band back to the starting position.
11) Upper Back Foam Roller Release

- Start by laying on a foam roller placed horizontally across your upper back with your hands behind your head for support.
- Bring your elbows in toward your head to help open your back and move the shoulder blades.
- From here, slowly lower you head down toward the floor and move back and forth on the foam roller. When you find tense areas, hover around those areas more.
- Keep your core engaged and pelvis tucked to prevent the chest from opening or overarching your back. Think pelvic tilt.
12) Foam Roller Pec Stretch
Why I love this exercise: Stretches tight chest muscles caused by being hunched over feeding your baby.
- Begin by laying on the floor with the foam roller running along your spine.
- Place your feet flat on the floor and reach your arms out to the side with your palms facing up.
- Bend your elbows to a 90 degree angle as if to make goal posts with your arms.
- Keep your elbows in line with your shoulders and try to drop your forearms toward the floor without allowing your shoulders to creep up to your ears.
- You should feel this across your chest.
- Hold for 30 seconds or longer
13) Puppy Pose
- Begin on your hands and knees, shoulders above wrists and hips above knees.
- Keeping your hips in place, slowly walk your hands out a few inches in front of you and tuck your toes.
- Depending on how your body feels, rest your forehead on the floor, towel or yoga block.
- Focus on keeping your arms active by pressing them into the ground while your pull your hips slightly back toward your heels. Do not let your elbows touch the ground.
- Relax and breath into your back to feel the spine lengthen. You should feel a nice stretch in your back and lat muscles.
- Hold then release.
14) Eagle Arms
Why I love this exercise: Stretches the upper and mid back which tends to get very tight from spending all day sitting and carrying your baby.

- Begin by sitting or standing tall. Bring your arms straight out in front of you and parallel to the ground.
- Slightly bend your arms and cross your right arm over your left arm, hooking them together at the elbows.
- With your arms hooked, bring your forearms together and wrap your left palm around your right palm and bring your palms flat together.
- With your arms crossed, lift your elbows while keeping your shoulders down.
- Take a couple deep breaths in this position, release and switch sides.
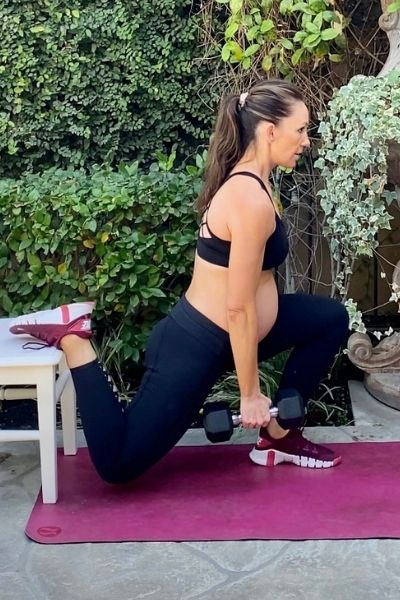
15) Hip Flexor Stretch /Hamstring Stretch
Why I love this exercise: Loosens tight hip flexors and hamstrings from long periods of sitting.
- Start in a lung position with your back knee on the ground and your right foot forward.
- Shift your hips back as you straighten your forward leg to a stretch that feels good but is not painful..
- To keep the length in your back, place your hands beneath your shoulders and push through your finger tips. Place yoga blocks under your hands if you cannot keep your back straight.
- Keep a straight back and maintain the length in your spine.
- Engage your quadricep muscles and keep your right knee facing directly up, with a little bend in your knee if needed to prevent hyperextending.
- Hold for about 30 seconds, then engage your core and slowly move your hips forward into a hip flexor stretch.
- Focus on lifting your belly button toward your rib cage, and keep your shoulders and neck relaxed.
- Move back and forth between these positions 5-8 times then switch sides.

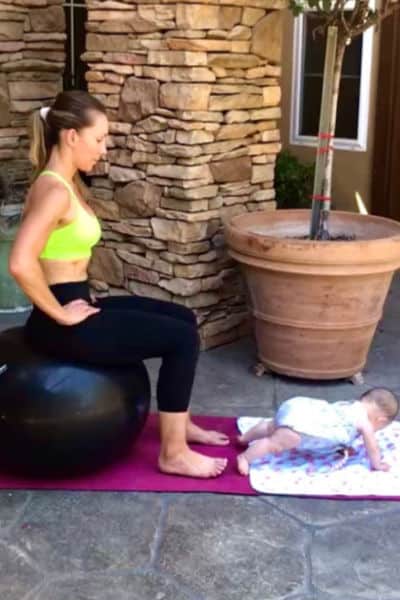
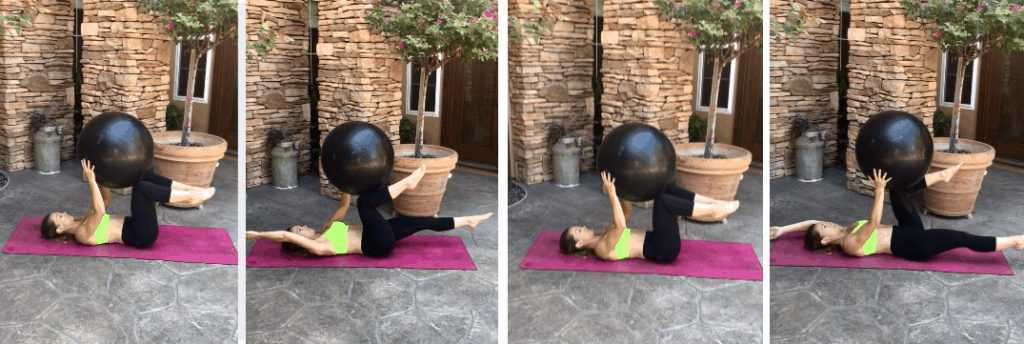
15) Dead Bugs With Exercise Ball:
Why I love this exercise: This is a foundational postpartum exercise that helps to regain strength and function of the core muscles to provide better spinal alignment.
- Begin by lying on your back with your arms straight up toward the ceiling and your knees up lifted so they are directly over your hips.
- Place an exercise ball between your knees and hands, holding it directly over your core.
- On an exhale, engage your core to stabilize your spine and slowly lower your right arm and left leg toward the ground without letting your lower arch. Keep slight pressure on the ball with your opposite hand and knee to help engage the core.
- Only lower as far as you can without losing engagement in your core.
- Inhale and use your core to bring your arm and leg to the starting position.
- Repeat on the opposite side with you left hand and right foot lowering toward the ground.
- Alternate back and forth.
When Can I Start Exercising After Pregnancy?
You may be experiencing back pain from breastfeeding sooner than you feel ready to start an exercise routine.
However, these exercises and stretches are gentle enough to do in the first few weeks postpartum to help alleviate aches and pains from carrying and feeding your baby.
The general rule of thumb is to wait approximately six weeks to exercise after delivery.
However, with your doctor’s permission, many moms can start light exercises as soon as they feel ready.
These exercises should be focused on rehabilitating your breathing mechanics, core and pelvic floor.
Exercise in the first few weeks postpartum can do wonders for your mood, fatigue and overall well being.
Related: How To Start Exercising After Pregnancy [The Complete Guide]
How to Relieve Back Pain From Nursing
If you are already suffering from back pain while breastfeeding, here are a few things you can do to get relief:
Use a Heating Pad
A hot compress can help relax tight or strained muscles.
My “Bed Buddy” was my best friend when I was postpartum. I could wear it around the house without it getting in my way.
Take a Bath
A warm bath with some epsom salt will help your body and muscles relax.
Opt for a Firm Chair
The right chair can make a world of difference!
A supportive chair will help keep you in a proper nursing position and prevent you from slouching over.
Limit Carrying Baby In a Carrier or Wrap
While wearing your baby is great for bonding, exercise and just getting stuff done, it can also add stress and tension to your body.
If you are feeling back pain while breastfeeding, try putting your baby down in a safe place and taking a break.
Related: Babywearing Without Back Pain [How To Do It Safely]
Ask For Help
Breastfeeding can be a wonderful experience for both you and your little one, but if you’re experiencing back pain, don’t hesitate to ask for help from family members or friends.
Strength Train
A strong back is better able to support your body while breastfeeding.
Stay hydrated
Believe it or not, dehydration can lead to more body pain and discomfort.
Breastfeeding moms need about 13 cups of water per day!
Proper hydration also helps you maintain your milk supply.
Related: Struggling With Breastmilk Supply? Try These Tips For a Boost
Final Thoughts on Tips To Relieve Back Pain From Breastfeeding
Back pain from breastfeeding is challenging but with these tips and exercises, you can enjoy this special time pain free.
Use these exercises and stretches even after you stop breastfeeding to keep your back healthy and pain-free.
Most importantly, don’t forget to ask for help when you need it and take breaks when your body is telling you to.
With a little bit of care, you can enjoy all the wonderful moments of motherhood without the added pain!
Brooke is a certified Prenatal and Postnatal Exercise Specialist with a Bachelors of Science degree in Kinesiology-Exercise Science. She is also a mom of 3 girls with more than 15 years of experience in health and fitness. Brooke’s goal at Struggles of a Fit Mom is to help motivate, educate and inspire other busy mamas who struggle with finding time, energy and motivation to take care of themselves in the chaos of motherhood.