17 Postpartum Exercises To Transform Your Mom Butt
Is that cute pregnancy bump not the only thing you lost after pregnancy?
Unfortunately, many of us moms loose our booty’s too.
You may have tried one of those “Squat Challenges” you saw floating around on Pinterest only to be left frustrated because your booty is still missing.
I hate to be the bearer of bad news, but more squats is NOT the answer to fixing your mom butt.
One of the biggest exercise misconceptions when it comes to exercises is that just because you are doing a movement to target a specific body part doesn’t mean that you are actually engaging the right muscles.
This means that you can do all the squats in the world but if you are not properly activating the glute muscles, you will never see the drastic results you are looking for.
Luckily, getting it back isn’t as hard as you may think.
In this post, I share why you may have lost those luscious curves from pregnancy and my most favorite exercises to get them back, better than ever!
What is the “Mom Butt”?
The term “Mom Butt” is just as unflattering as trying to fit into a pair of jeans only to realize they now sag in the booty area.
However, it is definitely a real thing.
I get countless messages from moms asking, “what happened to my booty after pregnancy?!”
Simply put, the mom butt is described as a flat butt as a result of pregnancy.
So let’s see why this happens.
Why Your Bum Gets Flatter After Pregnancy
So why does your butt disappear from pregnancy?
1. Hormones
During pregnancy, our bodies release a joint softening hormone called “relaxin“.
This is hormone is responsible for softening the pelvis to prepare for delivery.
However, it also softens every joint in your body which can contribute to poor posture and more relaxed joints which can inhibit the glute muscles from activating properly.
2. Posture Changes
The extra weight gained during pregnancy, weaker abs and the weight of the growing uterus pulls the pelvis forward which causes a shift in your center of gravity.
This shift causes your hip flexors to become over-active (tight) and your glutes to become under-active (weak).
The combination this pelvic tilt and poor core strength weakens the glute muscles. (source)
3. Inactivation
Have you ever heard the term, “use it or lose it?”
Tight hip flexors can prevent our glute muscles from firing as effectively.
When the glute muscles are not activated properly, we end up compensating with other muscles and often times, the muscle you think you are working is not actually doing the work.
And a muscle can’t grow or even maintain strength if it is not activated properly.
This is worsened by the fact that you will likely become less active the further along you get in your pregnancy.
4. Sitting
You may find yourself sitting more often in the third trimester and immidiatly postpartum, and for good reasons!
However, sitting for long period of time can cause tight hip flexors and weakened glutes.
While this is often unavoidable, it is important to be aware of.
5. Exercise Choices
Many expecting moms either stop exercising entirely during pregnancy, or choose different exercises because they are unsure of how to navigate their prenatal workout routine.
Exercises like walking or prenatal yoga are great but they are not the best options for maintaining glute strength and activation.
Muscle strength and “tone” requires proper activation and specific strength training exercises.
And if you are doing a lot of walking without proper glute activation, you are most likely compensating with other muscles which can further weaken the glutes.
Related: These Are The 15 Best Exercises To Target Your Underbutt
6. Breastfeeding
The combination of prolonged sitting while nursing and the extra calories burned to produce breastmilk can cause you to lose muscle mass.
I know first hand how hard it can be to make sure you are getting the proper nutrition you need while breastfeeding.
However, if you want to put that junk back in your trunk, what you eat is just as important as how you workout.
If you need quick, easy recipes to support both your baby and fitness goals, these are some of my favorite recipes.
Related: 7 Postpartum Weight Loss Tips To Lose Weight, Not Milk
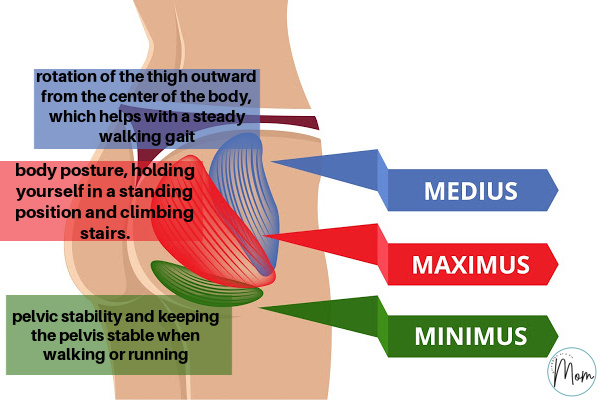
Why You Need Strong Glutes
The three muscles that make up your glute muscles are the largest and strongest muscles in your body.
These three muscles work together to stabilize the pelvis and maintain proper movement in the hips.
While we all want a nice, perky backside, having strong glutes is important for helping heal your core, pelvic floor and building your overall strength back, especially after pregnancy.
Strong glutes also helps:
- Injury prevention: Strong glutes helps prevent imbalances in the hip which can lead to back injuries or pulled muscles in your hamstrings or groin.
- Athletic performance: Strong glutes can help you run faster, jump higher and improve overall athletic performance.
- Improve Confidence: Having a perky tush will help you feel more confident in your postpartum body!
The Mom Butt Fix
One of the biggest mistakes people make when working their glutes is they dive head first into exercise like squats or lunges only to left either frustrated with lack of results or even worse, injured.
Maximizing your glute gains is a three step process:
- Release tight tight hip flexors and muscles with foam rolling and stretching
- Glute activation exercises to help improve mind muscle connection necessary for building strength.
- Strengthening exercise to improve muscle mass and definition.
Think of glute activation as waking up the muscle and saying “hey, it’s time to do your job”.
This helps improve the mind-muscle connection that is necessary to help improve strength.
Perform these three steps prior to your glute workout or this can be done at any time simply to wake up those glutes and tell them to do their job.
Keep these release and activation exercises in your back pocket as a warm up to all your lower body workouts.
Step 1. Foam Rolling to Release Tight Spots
Estimated time: 4-5 Minutes
Foam rolling will help improve range of motion and responsiveness of the tissue.
Glutes- Pirifromis Muscle & Hamstring
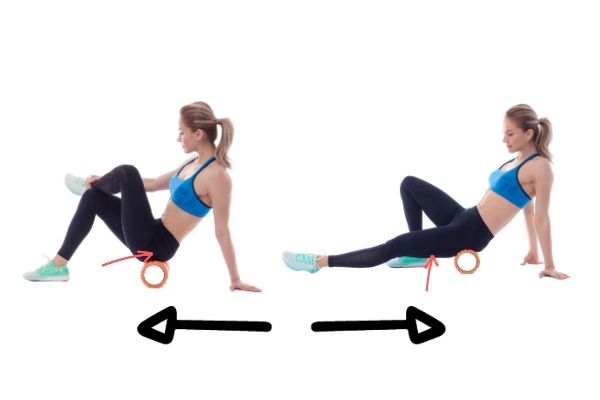
- Gently sit on top of a foam roller.
- Gross one ankle over the opposite knee.
- Slightly roll your hips at an angle toward the outside of the leg that is crossed.
- Slowly roll back and forth as you feel for tightness in your Piriformis muscle.
- You should feel the roller pressing into the tissue of the hip socket.
- Continue rolling for about 20-30 seconds as you slight slight change positions front to back and side to side. Then move down toward your hamstrings and under your buttocks where the glute and hamstring muscle meet.
- Continue rolling back and forth along your hamstring for 20-3 seconds then switch sides.
Glutes- TFL Release
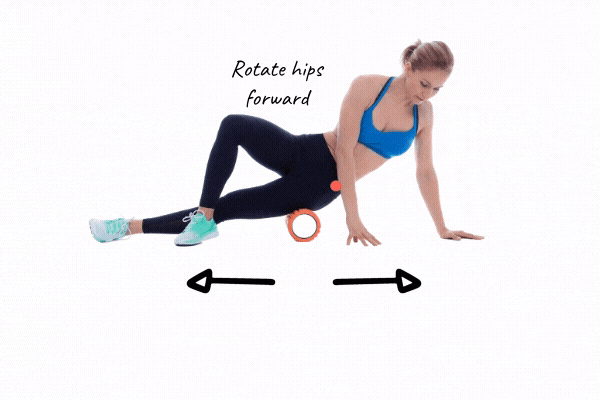
- Begin by finding placing your hand on the top of your hip bone. The TFL is a very small space on the front corner of your hip bone.
- Gently start by placing the foam roller under your side.
- Take your top knee and bend it over the leg that is lying on the foam roller.
- Rotate forward until your top knee drops to the floor.
- This muscle is probably very tight. Pay attention to any tender spots as you make small movements and rest there for 20-30 seconds.
Glutes- Hip and Quad Release
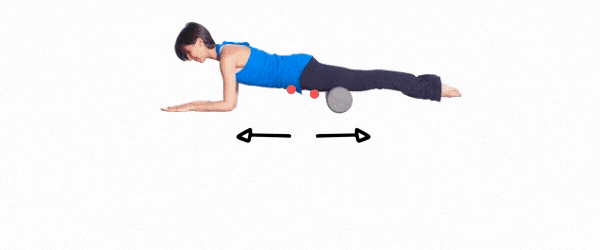
- Start by placing the foam roller under your right leg and top of your hip with arms in a plank position for support.
- Make sure your core is engaged.
- NOTE: This exercise can be avoided if you have sever abdominal separation and see and coning. Skip to stretching.
- You can scoot to the far edge of the foam roller so that your left leg is able to touch the floor.
- Use your elbows and forearms to gently roll your body back and forth to feel for any tight spots along the top your your hip flexor and thigh. Slight shift your body back and forth and side to side to hit all the areas of your thigh and hip flexor. Pause and hold on any tight spots.
Step 2: Stretch
Estimated time: 5 minutes
Now that you have released tight spots, it’s time to do a little stretching.
You aren’t trying to be Gumby here, you just want a little flexibility for better range of motion and muscle activation.
Hip Stretch:
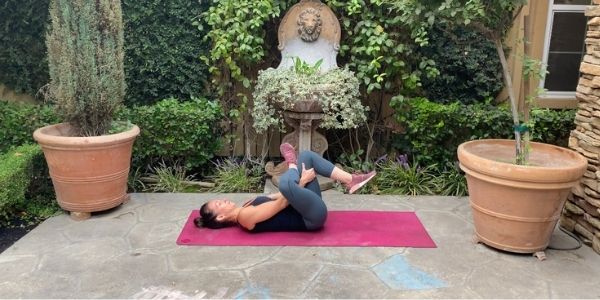
- Lay on your back with your knees bent.
- Cross one foot over the opposite knee to create the shape of the number four.
- Keep your top flexed and back straight and thread your arms through your legs to grab the back of the leg that is on the floor.
- Take a deep inhale then on the exhale and gently pull your thigh toward your body until you fill a stretch in your outer glute.
- Hold for 20-30 seconds and repeat on the other side
- Repeat for 3 sets.
High To Low Lunge
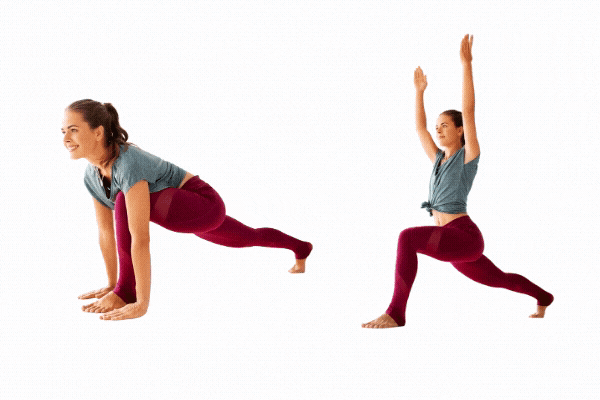
- Begin in a plank position.
- Step one foot forward so that it is directly between your hands while keeping the back leg firm and straight. Keep your core engaged to prevent any arching in your low back.
- Keeping the front knee bent and aligned with the ankle, slowly reach up with both arms as high as you can toward the sky. Make sure the back leg is straight and strong.
- Hold for a breath at the top then slowly lower your hands back down. That counts as one rep.
- To get the most out of the stretch, make sure your abs are fulling engaged to prevent your low back from arching. You should feel this in your hip flexors and quad muscles.
- Repeat this motion 5-10 reps each leg, pausing for several breaths on each movement.
Step 3: Activate
Now that you have released those tight spots, now it’s time to fire up those glutes with a little activation exercises.
You also want to have some core activation to help keep your pelvis and posture in line to support your lower body workouts.
Lateral Band Walks
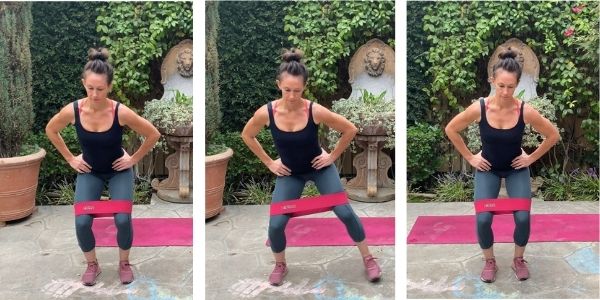
- Carefully place a mini band around both legs just above your knees.
- Engage your core and lower into a half squat position with your feet shoulder width apart.
- Staying low, initiate the movement by pushing off your left foot and taking a lateral step toward the right with your right foot.
- Slowly bring the left leg toward the center and repeat the movement by pressing off the left foot and laterally stepping with the right foot.
- Complete 12-15 reps then switch directions.
Glute Bridge with Pulse
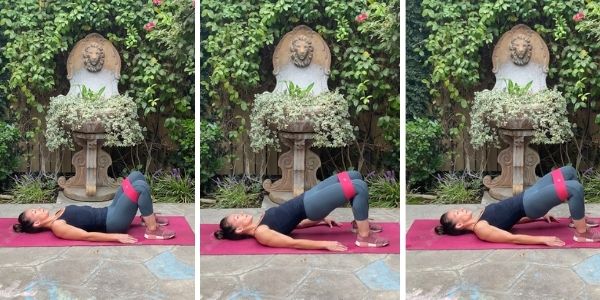
- Start on you back with your knees up and feet comfortably placed on the floor. Place the loop band around your knees.
- Exhale and engage you core and pelvic floor.
- Slightly press your knees out against the loop band as you press through your heels to lift your bottom off the floor and contract your glutes.
- Lift your hips until you reach a straight line from your shoulders to knees or as far as you can without arching your back.
- To contract your glutes, imagine cracking a walnut between your cheeks!
- With your core and glutes firmly engaged, hold this position at the top then slowly press your knees against the loop band to perform. Then bring them back to the starting position.
- At the end of the pulse, slowly lower your bottom back to the ground.
- Repeat for 12-15 reps
- 3 Sets
Clams with Resistance Band
This can also be done lying down or without a loop band.
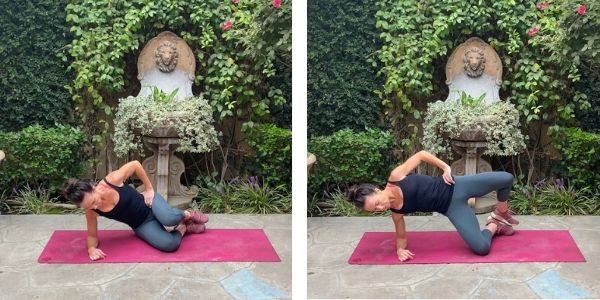
- If you are using a loop band, place it around your thighs just above your knees.
- Lie in a side plank position on your forearm with your hips stacked and knees at a 45-degree angle. Place your top hand on your hips to prevent putting it in front of you for balance. This shifts the focus of the exercise.
- Engage your core to prevent arching in your low back.
- Keeping your legs bent, press through your bottom knee to lift your hips up off the ground. You should feel your glutes.
- As you lift your hips, lift your top leg toward the ceiling while keeping the knee bent.
- Open up your legs, and using your glutes, lift the top leg toward the ceiling.
- Think squeezing your glutes forward as you lift the top leg.
- Pause at the top for a few seconds, then slowly lower.
- Repeat 12 reps then switch sides.
- Perform 3 sets for each leg.
Prone Leg Lift
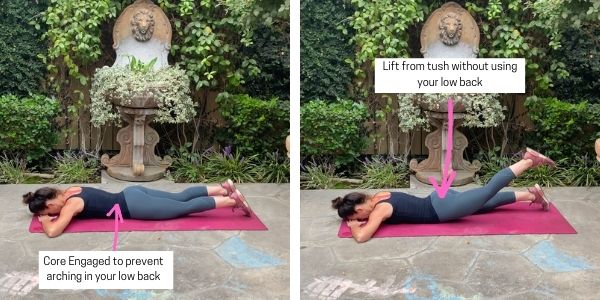
I like this variation of the leg lift for waking up the glutes because it takes the lower back out of the equation if done correctly.
As it gets easier, you can add 5-pound ankle weights or perform more reps per leg.
- Begin on your stomach with your legs straight out behind you. Rest your head on the back of your hands.
- Engage your core and make sure your pelvic bones stay glued to the floor during the exercise.
- Contract (squeeze) your right glute and use it to lift your leg off the floor as far as you can without excessive movement or pain in your back.
- Keep squeezing the glute and hold your leg in the lifted position for 5 seconds.
- Slowly lower your leg back to the floor and repeat.
- Continue for 10-12 reps each leg
- 3 sets
Mom Butt Fix Exercises
Now that you have prepped your glutes for your workout, it’s time to put them to work with this 20 minute workout.
Workout Instructions:
Use an interval timer app on your phone. I use the Gym Boss timer app.
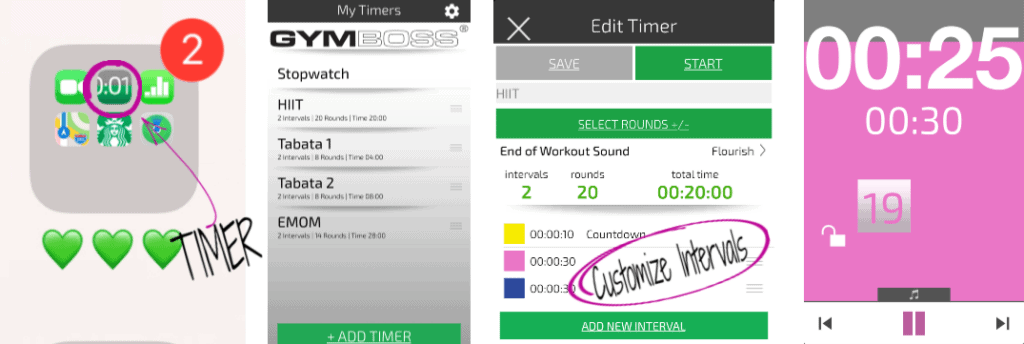
Select the interval ratio for your fitness level.
You will do 5 rounds of each circuit
Beginner: Perform each exercise for 30 seconds with 30 seconds rest.
Intermediate/Advanced: Perform each exercise for 40 seconds work with 20 seconds rest
Circuit #1
Single leg hip thrust
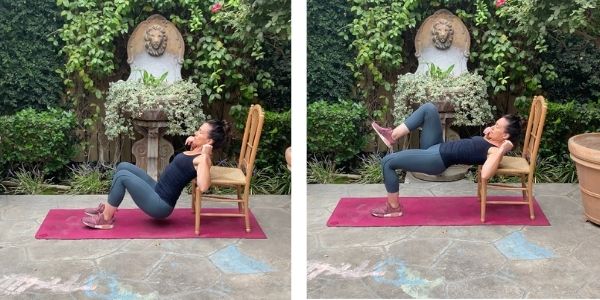
- Using a sturdy chair or bench, carefully slide yourself down until the edge of the bench is just below your shoulder blades.
- Place the backs of your arms against the edge for support but DO NOT use them to help in the movement.
- Place your feet in front of you so that your knees are at a 90 degree angle.
- Engage your core to keep your ribs down and contract (squeeze) your left glute muscle.
- Pressing through the heel, drive your hips up as far as you can without arching your back.
- Keep your gaze forward and not up or behind your. The movement comes from the lower body and there so be no rocking of the upper body.
- Continue squeezing your glute at the top for a count of 3, then slowly lower to the starting position.
- Repeat on the same leg for the duration of the interval, then switch legs.
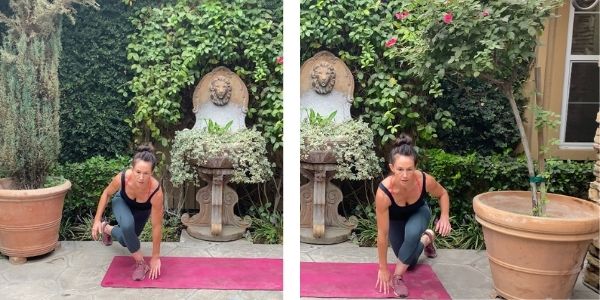
Bulgarian Split Squat
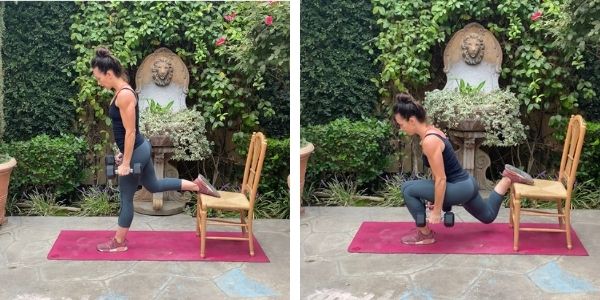
- Start by standing about 2 feet in front of a bench or sturdy chair.
- Grab a pair of dumbbells and lift your right leg and place it on the surface behind you. (you can also do this without weights).
- Your front foot should be far enough in front of you to be able to comfortably squat down. You can hop your foot around a little until you find the right spot.
- Engage your core, squeeze your glute, and slightly lean forward at the waist.
- Descend down into a single leg squat. The weight of your body should be in the heel.
- Stop when your thigh is a little lower than parallel to the ground or as far as your flexibility allows.
- Push through your left heel to engage the glute and return to standing.
- Repeat for the duration of the interval, then switch legs.
Circuit #2
Deficit reverse lunge
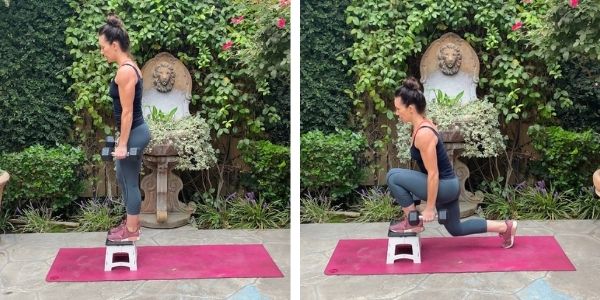
- Holding a pair of dumbbells, stand on a sturdy bench, chair or step stool with your feet about shoulder-width apart.
- Engage your core and carefully step your right foot back landing on the ball of your foot.
- Continue bending your front knee as you sink into a deep lunge.
- Focus on keeping your core engaged so you don’t stick your butt out. You may need to start without weights and place your hands on your hips so that you can make sure your hips are not tilting.
- Drive the your top foot to return to the standing position.
- Continue for the duration of the interval then switch legs.
Goblet Squat with Loop Band
The tension of the loop band increases mind muscle connection.
- Place a loop band around your thighs, just above your knees.
- Holding a dumbbell or kettlebell at your upper chest, stand with your feet slight wider than shoulder width apart and toes slightly pointed out.
- Keeping your elbows close to your chest and pointing down, hinge at your hips and bend your knees to slowly lower your body as far as you can.
- Hold the position at the bottom for 2 seconds, the drive through your heals to engage your glutes and return to standing.
- Complete for the duration of the interval.
Circuit #3
Glute Bridge with Resistance Band

This is by far my favorite hip thrust/glute bridge variation right now, it burns so good!
You can either use a large resistance band (which is by my favorite for this exercise!) or simply hold a dumbbell at your pelvis for added resistance.
- Start on you back with your knees up and feet comfortably placed on the floor. Place the loop band under your feet and pull it up to your hips.
- Using your feet to hold the band down, exhale and engage you core and pelvic floor.
- Give your glutes a little squeeze and press through your heels to lift your bottom off the floor.
- Lift your hips until you reach a straight line from your shoulders to knees or as far as you can without arching your back.
- To contract your glutes, imagine cracking a walnut between your cheeks!
- Hold this position at the top and slow and controlled, lower your bottom back to the floor.
- Repeat for the duration of the interval.
Walking lunge
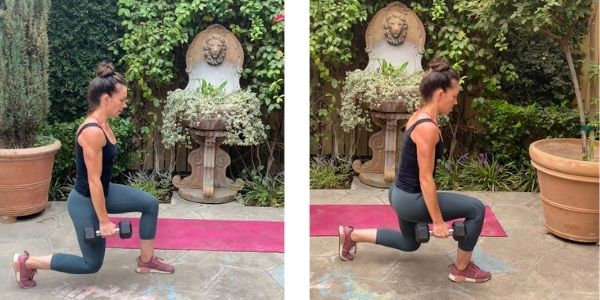
- Begin with your feet about shoulder width apart holding a pair of dumbbells at your side.
- Keeping your core engaged, step one foot forward while keeping it in line with your hip bone.
- Step far enough so that both knees create a 90 degree angle as you lower into a lunge.
- Push through your front heel as you stand and bring your back leg to meet your front leg.
- Step the opposite leg forward and repeat.
- Continue alternating legs in a forward motion for the duration of the interval.
Circuit #4
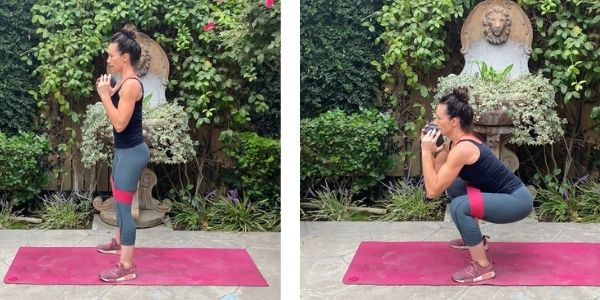
Jump squats

- Start standing with your feet shoulder-width apart.
- Bend your knees and descend into a regular squat. Engage your core and explosively jump into the air.
- When you land, lower your body into a squat position to complete one rep.
- Make sure your focus on landing with your knees bent and as gently and quietly as possible to control the movement.
Skater hops
- Start with most of your weight on your right foot with your left leg slightly behind your right foot in a small curtsey lunge with your
- Pushing off of your right foot, jump sideways to the left, landing slightly crouched onto your left leg with your right leg behind your left ankle.
- Repeat the movement by jumping off of your left foot sideways to the right.
- Continue back and forth for the duration of the interval.
Will You Have to Do All The Prep Work Forever?
Okay, you might be wondering if you have to do all the stretching and activating forever.
While you may not always have time for the warm up, from personal experience, your glute workouts will be much more effective with proper muscle activation.
If you don’t have time for the stretching and rolling, I recommend at least doing a warm up with the activation exercises!
Transforming your “mom butt” is definitely possible!
This workout is one of my absolute favorites and I hope you love it as much as I do!

Brooke is a certified Prenatal and Postnatal Exercise Specialist with a Bachelors of Science degree in Kinesiology-Exercise Science. She is also a mom of 3 girls with more than 15 years of experience in health and fitness. Brooke’s goal at Struggles of a Fit Mom is to help motivate, educate and inspire other busy mamas who struggle with finding time, energy and motivation to take care of themselves in the chaos of motherhood.